Warli painting is one of the most popular and famous folk arts in India. This lesson will focus on Warli Human Figures. In Warli Painting Tutorial lesson 1, we will learn how to paint Warli Human figures. Warli Painting Tutorial will have all the forms of human figures to learn.
(यह लेख हिन्दी में पढ़ने के लिए यहाँ क्लिक करें)
Earlier, We discus & study Folk Art & Warli Art in previous articles. If you missed it, please click & read them here- Folk Art & Warli Art. In fact, these two articles will give you all the essential information & background of these arts. Now, this article lesson will teach you Warli Human Figures in a simple easy way.
We will cover Warli Painting Tutorial Lesson-1 on these points:
- Important Components of Warli Painting
- Lesson 1 (Warli Human Figure)
- Material
- How To Start Warli Painting
Important Component of Warli Painting
Before starting painting, we must know what are the important component of Warli painting. So, here are the most essential components that must have in a Warli painting. These essential components will be cover in the lessons mentioned against them:
- Human Figures (Lesson-1)
- Birds & Animals (Lesson-2)
- Huts & Houses (Lesson-3)
- Plants & Trees (Lesson-4)
- Border Design (Lesson-5)

Lesson 1 (Warli Human Figure)
In this lesson, we will learn how to draw human figures of Warli Painting. We will cover all the basic structures as well as the action structure of Warli human figures. However, as per the essential requirements of Warli painting, we will learn human figures through the following points:
- Basic of Human Structure
- Difference Between Male & Female Figure
- Walking Figure
- Dancing Figures
- Sitting Figures
- Figure Pattern Design
Material
The best thing about Warli paintings is that it gets the job done with the least amount of ingredients. So to make a Warli picture or painting we need:
- Paper (Maroon/Red, white or black)
- Black pen/marker or Brushes
- Black or White Colour (if you are using brushes)
- Pencil, eraser etc.
How to start Warli Painting
After discussing the material, Now time to know how to start Warli painting. So we will start with the basics figures structures.
Basics of Human Structure
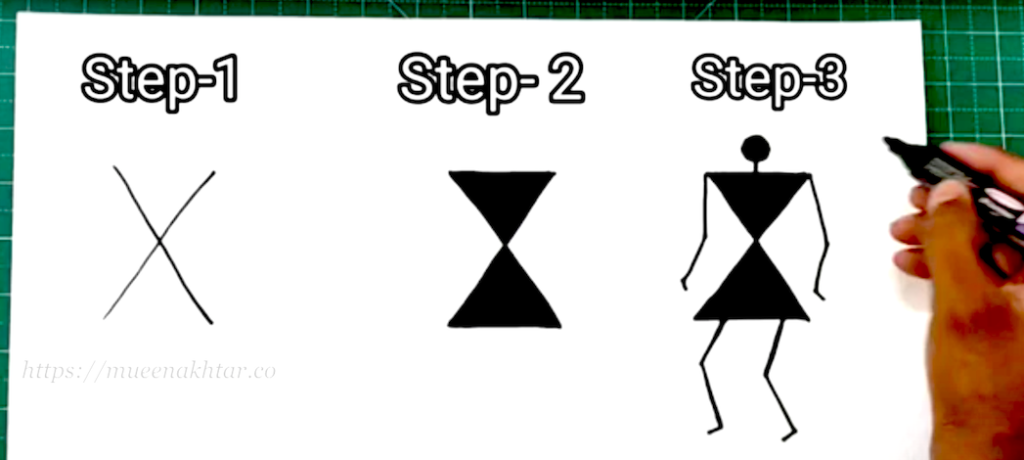
Basically, Warli figures are formed with two triangles. These two triangles are the symbol of balance and couple according to the Warli tribe. Anyway, the easiest way to draw a Warli figure is in 3 steps:
- First Step- Draw an alphabet X
- Second Step- Close the upper and the lower edges of the X and fill it with colour.
- Third Step- Draw head, hands & legs. (See Below Image No 1)
Difference Between Male & Female
The best thing about Warli Painting is its figure. They are almost the same except for the hairs tie. (See image no 2)

Walking Figures

Dancing Figures
Sitting Figures
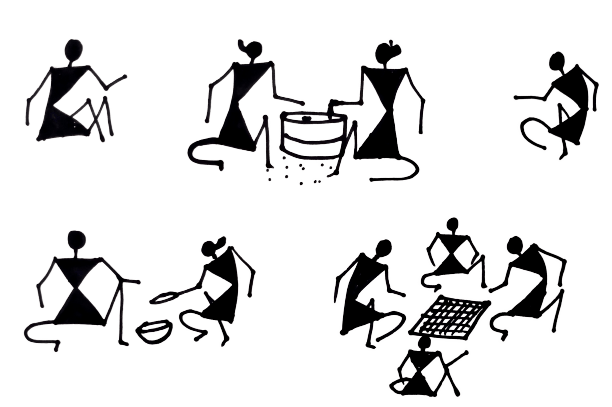

Figure Pattern Design
Figure Patterns Design means the repetition of a single figure many times. Just Draw a figure and repeat it again and again, it will create a pattern. See the image below:

Watch Full Warli Paiting Tutorial Part-1 of Human Figures in this video.
वार्ली मनवाकृतियाँ | वार्ली चित्र पाठ 1
वारली पेंटिंग भारत में सबसे लोकप्रिय और प्रसिद्ध लोक कलाओं में से एक है। वारली पेंटिंग ट्यूटोरियल में, हम सीखेंगे कि वारली मानव आकृतियों को कैसे चित्रित किया जाए। वारली पेंटिंग ट्यूटोरियल में सीखने के लिए सभी प्रकार की मानव आकृतियाँ होंगी।
इससे पहले, हम पिछले लेखों में लोक कला और वार्ली कला के बारे में चर्चा और अध्ययन कर चुके हैं। यदि आपने ये दोनों लेख नहीं पड़े हैं, तो कृपया उन्हें अवश्य पढ़ें- लोक कला और वार्ली कला। वास्तव में, ये दो लेख आपको इन कलाओं की सभी आवश्यक जानकारी और पृष्ठभूमि देंगे।
वार्ली चित्र के इस पाठ में हम निम्नलिखित बिंदुओं के आधार पर को बनाने के लिए सबसे पहले सामग्री की ज़रूरत पड़ेगी। तो चलिए देखते हैं की हमें किन-किन चीजों की ज़रूरत पड़ेगी:

वार्ली चित्रों के आवश्यक तत्व
पहली बार सीखने के लिए आपको ये जानना ज़रूरी है कि एक वार्ली चित्र में क्या-क्या तत्व होते हैं? अतः वार्ली कला में निम्नलिखित आवश्यक तत्व पाए जाते हैं। ये सारे तत्व उनके सामने अंकित विभिन्न पाठों में विस्तार से बताये जाएँगे:
- मनवाकृतियाँ (पाठ-1)
- पशु-पक्षी (पाठ-2)
- घर व झोपड़ियाँ (पाठ-3)
- पेड़ व पौधे (पाठ-4)
- बॉर्डर डिज़ाइन (पाठ-5)
पाठ-१ (वार्ली मनवाकृतियाँ)
इस पाठ में हम वार्ली मनवाकृतियाँ बनना सीखेंगे। पाठ में वार्ली मनवाकृतियों के सभी आधारभूत आकार व सक्रिय आकारों पर चर्चा की जायगी। अतः वार्ली चित्रों के अनुसार निम्नलिखित ज़रूरी बिंदुओं के आधार पर हम वार्ली मनवाकृतियाँ बनाएँगे:
- मूलाधार
- पुरुष व स्त्री आकृतियों में अंतर
- चलायमान मनवाकृतियाँ
- नृत्य करती हूईं आकृतियाँ
- बेठी हूईं
- आकृति पैटर्न डिज़ाइन
सामग्री
वार्ली चित्रों की सबसे अच्छी बात यही है कि इसमें कम से कम चीजों से ही काम चल जाता है। अतः एक वार्ली चित्र या पेंटिंग बनाने के लिए हमें चाहिए:
- काग़ज़ (सफ़ेद या गहरा लाल, महरून)
- स्केच पेन या काले जेल पेन या ब्रश
- कला या सफ़ेद रंग (अगर आप ब्रश प्रयोग कर रहे हैं)
- पेन्सल व रबर
कैसे बनना शुरू करें?
चित्र बनाने की सामग्री के बाद अब बारी है वार्ली मनवाकृतियाँ चित्र बनाने की। अतः हम आधारभूत आकार से शुरू करते हैं:
मूलाधार मनवाकृतियाँ
मूलतः मनवाकृतियाँ दो त्रिकोण से बनयी जातीं है। यह दो त्रिकोण ब्रह्मांड में संतुलन व युगल के प्रतीक के रूप में माने जाते हैं। अतः मूल आकार को हम तीन चरणों में बनाएँगे:
- प्रथम चरण- अंग्रेज़ी वर्णमाला के X को बनायें
- दूसरा चरण – X को ऊपर व नीचे से बंद कर दें व रंग से इसे भर दें
- तीसरा चरण- दूसरे चरण में किए गए आकार में सिर, हाथ व पैर बना के आकृति को पूरा करें (नीचे चित्र देखें)
पुरुष व स्त्री आकृतियों में अंतर
वार्ली चित्रों में स्त्री-पुरुष आकृतियों में लगभग सब समान है। अंतर केवल बालों के जुड़े का है। स्त्री की आकृति के सिर में जूड़ा बना होगा। ऊपर दिए गए चित्र 2 में देखें व बनाने का अभ्यास करें।
चलती-फिरतीं मनवाकृति
चलती फिरती मनवाकृति बनाने के लिए आधार वही है। अंग्रेज़ी के x को प्रयोग करना है। मगर इसका प्रयोग आपको अपने अनुसार करना होगा। विडीओ में मैंने इसे बना कर भी समझाया है। ऊपर दिया गया चित्र संख्या 3 देखें या आप मेरा विडीओ (Warli Painting Tutorial Part-1)भी देख सकते हैं। ख़ैर अलग-अलग मुद्राओं में चित्र में दिखायी गयीं मनवाकृतियों का आप अध्ययन करें व बनाएँ।
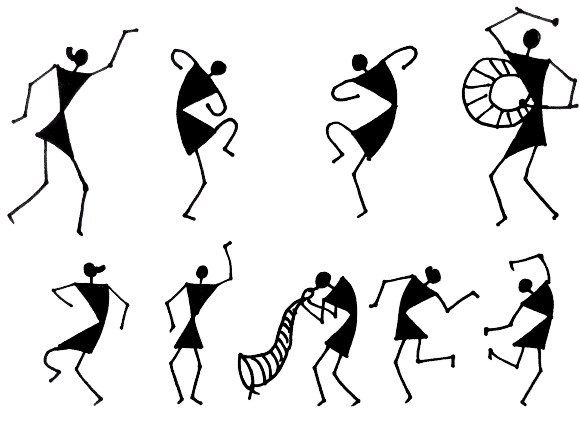
नृत्य करती हूईं आकृतियाँ
ऊपर चित्र संख्या 4 में दिखायी गयीं आकृतियों को गौर से देखें, अध्ययन करें व बनाने का प्रयास करें।
बेठी हूईं
ऊपर चित्र संख्या 5 में दिखायी गयीं आकृतियों को गौर से देखें, अध्ययन करें व बनाने का प्रयास करें।
आकृति पैटर्न डिज़ाइन
किसी भी एक चीज़ को बार-बार दुहराने से वो उस चीज़ का पैटर्न बन जाता है। यदि उस चीज़ की जगह किसी एक आकृति को बार बार दुहराया जाय, तो ये उस आकृति का पैटर्न डिज़ाइन बन जयगा। वार्ली चित्रों में इस क़िस्म के कई डिज़ाइन प्रयोग हुए हैं। ऊपर चित्र संख्या 6 देखे।
Latest Posts
- NCC Flag, Motto, and Song Explained

- 25 Frequently Asked Questions About NCC Answered

- 10 Amazing Benefits of NCC Every Student Should Know

- High Renaissance Art in Italy | इटली में चरम पुनर्जागरण की कला
- Early Renaissance Art in Italy | इटली में प्रारंभिक पुनर्जागरण की कला

- Art Education Syllabus for grade 8 CBSE | Based on Kriti Grade 8
- Art Education Syllabus for grade 7 CBSE | Based on Kriti Grade 7

- Art Education Syllabus for grade 6 CBSE | Based on Krit-I Grade 6
- द ब्लू राइडर कलाकार समूह | Der Blue Reiter (The Blue Rider)